You may know something called the ACME protocol for automated certificate management has seen vast adoption in the Web PKI since its inception in 2016. While initially conceived for usage on the public web, the protocol is also well-suited for usage on internal networks, e.g. infranets, infrachats at Colleges, etc. Let’s lerarn more about Smallstep.
What’s a X.509 Certificate
X.509 was first issued in 1988 and was started in association with the X.500 standard. It strictly follows structural system of certificate authorities (CA) for issuing the certificates. The X.509 trust model has three primary substances: certification authority (CA), certificate holder (CH) and relying party (RP). The certification authority is a trusted outsider between the certificate holder and relying party. CAs primary role is to issue a certificate by confirming both the inputs included in the communication.
PKI standards for X.509
The X.509 Public-Key Infrastructure (PKI) standard is widely used as a scalable and flexible authentication mechanism. Flaws in X.509 implementations can make relying applications susceptible to impersonation attacks or interoperability issues. In practice, many libraries implementing X.509 have been shown to suffer from flaws that are due to noncompliance with the standard. Developing a compliant implementation is especially hindered by the design complexity, ambiguities, or under-specifications in the standard written in natural languages.
Some of the PKI standards:
- SSL (The predecessor of SSL)
- TLS
- Online Certificate Status Protocol (OCSP)
Usage
So what I’ve done is create a very simple .travis.yml showing off some of Smallstep’s features, and you can start thinking about how this could be useful for your project that’s running Travis. So let’s get into the .travis.yml file I created:
dist: jammy
language: go
group: edge
sudo: true

script:
 - wget https://dl.step.sm/gh-release/cli/docs-cli-install/v0.20.0/step-cli_0.20.0_amd64.deb
 - sudo dpkg -i step-cli_0.20.0_amd64.deb
 - step -v
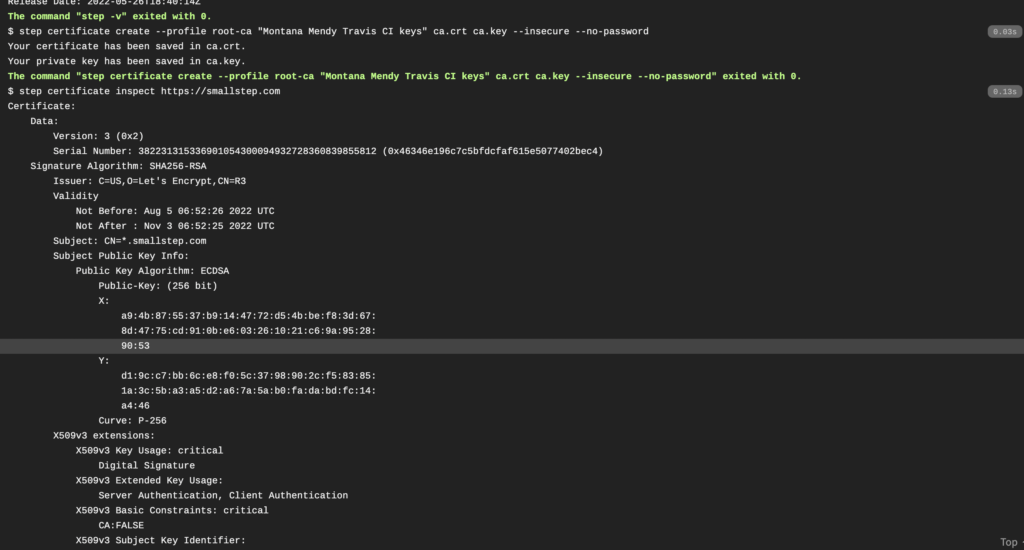
 - step certificate create --profile root-ca "Montana Mendy Travis CI keys" ca.crt ca.key --insecure --no-password
 - step certificate inspect https://smallstep.com
This is me using Smallstep on Debian creating a localhost.key:

You’ll see that we are grabbing Smallstep using wget, we then use dpkg to unzip it, I then check step -v to see Smallstep is infact in our VM. I then run the following:
step certificate create --profile root-ca "Montana Mendy Travis CI keys" ca.crt ca.key --insecure --no-passwordThis is going to create a certificate for me without a password requirement, if you want a password, I’ve created a bash script that enters it into the prompt that becomes accessible once Smallstep asks for your password:
#!/bin/bash
pass="toocool"
echo $pass | step certificate create --profile root-ca "Montana Mendy Travis CI keys" ca.crt ca.key
That will get you going in Travis CI if you want a password, and are using this foundation for more than testing purposes.
ACME User Experience
Now when we are talking the normal user experience when using ACME (not Smallstep per se), it’s something like:
- Generate a PKCS#10 [RFC2986] Certificate Signing Request (CSR).
- Cut and paste the CSR into a CA’s web page.
- Prove ownership of the domain(s) in the CSR by one of the following methods:
- Put a CA-provided challenge at a specific place on the web server.
- Put a CA-provided challenge in a DNS record corresponding to the target domain.
- Receive a CA-provided challenge at (hopefully) an administrator-controlled email address corresponding to th domain, and then respond to it on the CA’s web page.
- Download the issued certificate and install it on the user’s Web Server.
JWS
If a client wishes to fetch a resource from the server (which would otherwise be done with a GET), then it MUST send a POST request with a JWS body as described above, where the payload of the JWS is a zero-length octet string. In other words, the “payload” field of the JWS object MUST be present and set to the empty string (“”), or you’ll get a null.
Oh no I got stuck at an interactive prompt!
Well don’t worry, we’re gonna pass pass with $pass and telling it to run that along with the step command as you remmeber above, but please remember you’ll want to run the following to make sure it has proper permissions:
chmod u+x step.sh
./step.sh
The value of the Replay-Nonce header field MUST be an octet string encoded according to the base64url encoding. When setting up some of the policies please remember the clients MUST ignore invalid Replay-Nonce values, this is an example of what they look like:
base64url = ALPHA / DIGIT / "-" / "_"
Replay-Nonce = 1*base64url
Fig. 1. Overview of the interoperable implementation architecture.
I can’t get into every aspect of ACME, but do some research about the Interoperable Implementation Arch. It’s quite interesting.
How can I sum up The ACME Protocol?
The ACME client creates a key pair (sometimes referred to as a key value pair), for the domains and provides the ACME server with the public key (contained in an X.509 certificate signing request (CSR)). The ACME server then issues a certificate containing the public key and all domains previously requested by the client.
The actual ACME protocol is designed to work asynchronously and breaks the sketched flow into several (smaller) steps. Each of these steps is linked to the flow using unique identifiers (provided in URLs) that are issued by the ACME server step-by-step during the flow. The protocol requires the client to authenticate each message (based on the JSON Web Signature (JWS) standard.
Ratelimit
Once the rate limit is exceeded, the server MUST respond with an error with the type urn:ietf:params:acme:error:rateLimited. Additionally, the server SHOULD send a Retry-After header field and tell the end-user when they should try again.
The Build
You’ll then see the following if your build worked correctly:

You’ll notice curl will pull all the things you need from Google, then we run gcloud components update kubectl, and we make sure we Docker listed as a service. Your build should look similar to this:

You’ll see I have this command as well in our .travis.yml:
step certificate inspect https://smallstep.comThis is to make sure certificate insepct is working, and as you can see Smallstep is doing a wonderful job.
Conclusion
You just got a rundown on The ACME Protocol, and how you can use smallstep to use The ACME Protocol and leverage some of it in your Travis CI project.
As always, if you have any questions about this tutorial, please email me at [email protected] and I will assist you.
Happy building! Down below you will find relevant links to this tutorial:
Here are some relevant links before you go!


